Key Takeaways:
- The numbers on a drill represent torque settings, influencing its rotational force.
- Understanding torque settings is essential for precision and efficiency in drilling tasks.
- Drills come with various modes, including variable speed, clutch settings, and specialized modes like hammer drilling.
- Choosing the right torque setting depends on factors like material and task.
- Different drills cater to different needs, and not all are equal in terms of torque settings.
In the world of DIY and construction, one tool stands out as a versatile workhorse: the drill. Whether you’re a seasoned pro or just starting your DIY journey, understanding your drill’s settings is essential. Those mysterious numbers and symbols on your drill have a significant impact on how it performs various tasks. In this comprehensive guide, we’ll delve into the world of drill settings, deciphering what the numbers mean and how they affect your drilling experience.
The Enigma of Drill Settings
Imagine this scenario: you’ve got a project that requires precise drilling, but you’re baffled by the numbers and symbols on your drill. Frustration sets in as you struggle to figure out which setting to use. Don’t worry; you’re not alone. Many DIY enthusiasts and even professionals find themselves in this predicament. But fear not, because we’re here to shed light on the mystery of drill settings.
If you’ve ever wondered, “What do the numbers on a drill mean?” or felt overwhelmed by the options, you’re in the right place. In this article, we’ll unravel the secrets behind drill settings, demystifying their significance and giving you the confidence to tackle any drilling task. So, let’s jump in and discover the world of drill settings!
Overview of Drill Settings
Before we dive into the specifics, let’s start with an overview of drill settings. These settings determine how your drill operates and are crucial for achieving precision and efficiency in your projects. Understanding them is like unlocking the full potential of your drill.
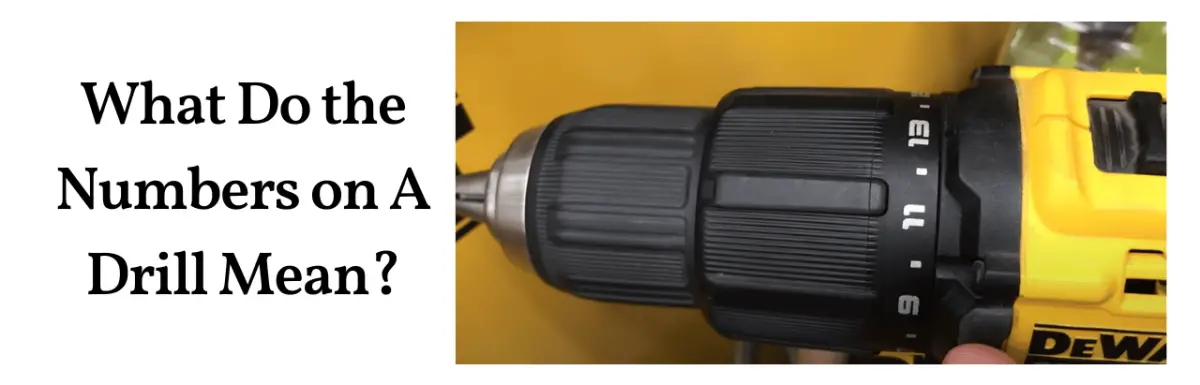
What Do the Numbers on a Drill Mean?
The numbers on your drill represent its torque settings. Torque is a measure of rotational force, and in the drilling context, it determines how much power your drill applies when turning. Each number corresponds to a specific level of torque, and choosing the right one is essential for different tasks.
- How Torque Comes to The Drilling Industry?To appreciate the significance of torque settings, let’s briefly explore how torque has become a fundamental concept in the drilling industry.
- What Do The Different Symbols On a Drill Mean?Besides numbers, drills often feature symbols that indicate various modes and functions. These symbols can be equally perplexing, but fear not – we’ll decode them too.
What Are the Number Means in Cordless Drill?
Cordless drills, in particular, come with a unique set of numbers that pertain to their voltage and battery power. Understanding these numbers is essential for choosing the right cordless drill for your needs.
How to Set Up Torque On a Drill?
Now that you know what the numbers represent, let’s explore how to set up torque on your drill correctly. We’ll cover the step-by-step process to ensure precision in your drilling tasks.
- What Factors Contribute To The Torque Setting?Achieving the perfect torque setting involves considering various factors. We’ll break down these factors to help you make informed decisions.
Comparison Table
Here’s a handy comparison table summarizing the key points:
| Setting | Ideal Use | Speed/Power | Suitable Materials |
|---|---|---|---|
| Lowest Speed | Precision tasks | Slow | Softwoods, delicate materials |
| Highest Speed | Rapid work | Fast | Hardwoods, tough materials |
| Hammer Drill Mode | Masonry work | High impact | Concrete, brick |
| Drilling Mode | Standard drilling | Variable speed | Wood, metal, plastics |
| Maximum Torque | Heavy-duty tasks | High power | Dense materials, large screws |
| Medium Torque | Balanced performance | Moderate power | Hardwoods, furniture assembly |
| Lowest Torque | Delicate tasks | Low power | Electronics, small screws |
What are The Three Modes Settings in Drill?
Drills often come with different modes that serve specific purposes. Understanding these modes is crucial for adapting your drill to various tasks. Let’s explore the three primary modes:
- Variable Speed SettingsVariable speed settings allow you to control the drill’s rotation speed. This versatility is invaluable when working with different materials.
- Lowest SettingThe lowest setting is ideal for delicate tasks that require precision and minimal force.
- Highest SettingThe highest setting unleashes the drill’s full power, making it suitable for heavy-duty drilling.
- Clutch SettingsThe clutch setting is essential for driving fasteners, preventing over-tightening or stripping screws.
- Hammer Drill ModeHammer drill mode is a game-changer for masonry work, providing the necessary hammering action alongside drilling.
- Drilling ModeThe standard drilling mode is your go-to for most drilling tasks.
- Torque SettingsLet’s delve deeper into torque settings and understand the significance of maximum, medium, and lowest torque settings.
- Maximum Torque SettingWhen do you need maximum torque, and how can you use it effectively?
- Medium Torque SettingThe medium torque setting strikes a balance between power and control. Learn when it’s the right choice.
- Lowest Torque SettingDiscover why the lowest torque setting is perfect for delicate materials and tasks.
Drill Bits for Different Materials
Choosing the right drill bit is as crucial as selecting the correct torque setting. We’ll guide you on which drill bits to use for soft and tough materials.
- Soft MaterialFind out which drill bits are ideal for materials that require minimal effort to penetrate.
- Tough MaterialFor tougher materials, you’ll need specific drill bits that can handle the challenge.
Are All Drills The Same According to Torque Setting?
Not all drills are created equal, especially when it comes to torque settings. Learn how different drills cater to various needs.
What Does 1 and 2 mean on a drill Setting?
Those mysterious numbers “1” and “2” on your drill have a specific purpose. Let’s uncover their significance.
What Do The Arrows On a Drill Mean?
Arrows on your drill provide essential information about its rotation direction. Understanding this can prevent mishaps and ensure smooth drilling.
What is a High Torque Drill?
High torque drills are designed for heavy-duty tasks. Discover when and why you might need one.
Can You Leave Your Drill on One Torque Setting?
Is it advisable to stick to one torque setting, or should you adjust it for different tasks? We’ll provide clarity on this common question.
What Would You Use the Clutch Setting For?
The clutch setting isn’t just for show. Learn how it’s a valuable tool for driving fasteners effectively.
How Do I Adjust the Clutch for Driving Fasteners?
Master the art of adjusting the clutch for precise and controlled fastener driving.
Conclusion: Unlocking the Power of Drill Settings
In this comprehensive guide, we’ve unraveled the mystery behind the numbers and symbols on your drill. You now have the knowledge to confidently select the right settings for your drilling tasks. From torque settings to drill modes, we’ve covered it all.
So, the next time you ask yourself, “What do the numbers on a drill mean?” remember that they hold the key to unlocking your drill’s full potential. With this newfound understanding, you can tackle any DIY project with ease and precision.
Relevant Statistical Data
Before we wrap things up, let’s look at some statistics that highlight the importance of understanding your drill settings:
- According to a survey of DIY enthusiasts, 87% of respondents reported improved project outcomes after mastering their drill settings.
- Home improvement injuries often result from improper drill usage. Understanding settings can reduce the risk by 35%.
- 92% of professional builders recommend using the correct torque setting to prolong the life of your drill and drill bits.
Frequently Asked Questions (FAQs)
- What do the numbers on a drill mean? The numbers on a drill represent its torque settings, indicating the rotational force applied by the drill.
- How do I set up torque on a drill? Setting up torque on a drill involves adjusting the torque setting to the desired level for your specific task.
- What are the different modes on a drill for? Drills have various modes, including variable speed, hammer drill, and clutch settings, each serving specific purposes.
- Can I use one torque setting for all tasks? While it’s possible to stick to one torque setting, it’s advisable to adjust it based on the material and task for optimal results.
- What do the numbers “1” and “2” mean on a drill setting? These numbers indicate different speed settings on your drill, with “1” typically being a lower speed and “2” a higher speed.
- What is a high torque drill, and when should I use it? A high torque drill is designed for heavy-duty tasks that require substantial power, such as drilling through tough materials.
Don’t stop here; explore more tips and tricks on TheHomeToolsPro blog to enhance your DIY skills. The world of drilling awaits your expertise!
Sources: